Enter a historical claim
Use the Historical Claim Entry for claim data which has been previously processed but isn't reflected in the history, for example a manually paid claim, a claim processed by another system, a balance remaining on a disputed case, or a negative claim used to adjust an incorrect historical claim.
This process won't generate a check or Explanation Of Benefits (EOB![]() EOBs are sent to members and payees to inform them of the disposition of claims. Typically an EOB identifies the date and type of service, the billed amount, deductibles, co-insurance, and an explanation of any ineligible charges. An EOB can also be a helpful tool in identifying fraudulent claims, as the member receives notification even when payment is made to the provider. An EOB isn't a bill.). No payments are made, but the accumulators and the claim detail will update.
EOBs are sent to members and payees to inform them of the disposition of claims. Typically an EOB identifies the date and type of service, the billed amount, deductibles, co-insurance, and an explanation of any ineligible charges. An EOB can also be a helpful tool in identifying fraudulent claims, as the member receives notification even when payment is made to the provider. An EOB isn't a bill.). No payments are made, but the accumulators and the claim detail will update.
You can't manually pend or delete historical claims, and they complete to HI—Historical status.
-
From the
Administration Processesmenu, select theHistorical Claims Entryoption depending on the type of claim (Professional, Institutional, or Dental).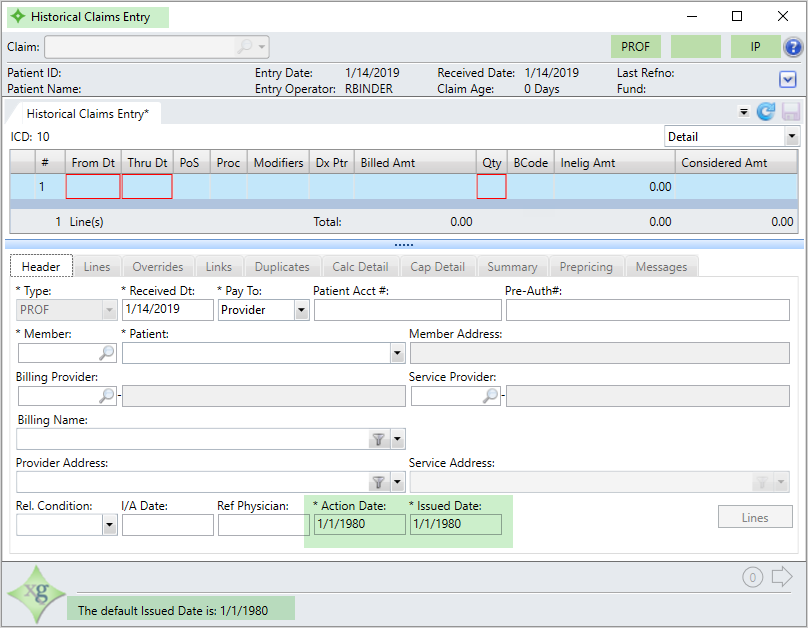
 Header workspace field descriptions
* indicates a required field
Field Claim Type Description Type *
All Claim type. This is a read-only field. Change the claim type
DENTINSTPROF
All Received date. The date the office received the claim.
- Enter or update the date in MM/DD/YYYY format (e.g. 01/05/2018 or 01052018).
- You can use the following date separators: (., -, /) or don't enter any separators.
- If your system is configured to tab over the date, it defaults to the current date.
Important: If you resolved a claim's pends or copied a duplicate claim's data, the Received Date might not be the original received date. Depending on your software version, you might see a
 next to the Received Date field. Hover over this icon to view the claim's original received date.
Pay To *
All Indicates who the payment will be made to:
Member.Provider.
Patient Acct #
All Patient account number.
Pre-Auth#
All Pre-authorization number.
Member *
All Member ID number.
Patient * All Patient associated with the claim.
Member Address All Address of the member associated with the claim. Institutional only Bill type is a 4-digit code that applies to institutional claims, where each digit identifies specific information:
- 1st digit is a leading zero and isn't used in Service.
- 2nd digit is the facility type.
- 3rd is the bill classification.
- 4th is the submission frequency.
All The tax ID number for the billing provider or organization that issued the bill for the services listed on the claim.
Hint: Enter a character or two in a provider box and then click
 to display a look-up window where you can search for the provider.
All The ID number for the provider who renders the services submitted by the billing provider.
Hint: Enter a character or two in a provider box and then click the
icon to display a look-up window where you can search for the provider.All The individual or organization that issued the bill for the services listed on the claim.
Provider Address
All The address for the billing provider or organization that issued the bill for the services listed on the claim.
Service Address All The address of the performed services listed on the claim. Admission Date Institutional only Date the patient was admitted.
- Enter or update the date in MM/DD/YYYY format (e.g. 01/05/2018 or 01052018).
- You can use the following date separators: (., -, /) or don't enter any separators.
Dental and Professional only Related Condition. Condition(s) related to the claim, such as Accident, Illness, or Work Related.
Dental and Professional only Date the illness or accident occurred.
Professional only ID number of the referring physician.
Place of Treatment (PoS) Dental only Place Of Service. Numeric code describing the location where service was rendered. The codes are defined by the plan administrators but also include basys defaults.
- In the
Headersubtab, enter theReceived Dtor tab through if your system is set up to automatically enter the current date.- In
Pay To, chooseMemberorProvideras applicable.- Your system might default to
Provider, if this is correct, tab through the field.
- Your system might default to
- Enter the Member ID in the
Memberbox. When you tab through the field, theMember Addressupdates.- If you want to enter the same Member for the previous claim, press
Enterto update the Member and Address fields.
- If you want to enter the same Member for the previous claim, press
- Select the correct patient from the
Patientlist.- Patient Notes might display together with a
Patient Notestab at the top of the screen depending on your system configuration. Enter the billing provider's tax ID in the
Billing Providerbox.Hint: To search for the Billing Provider tax ID enter the ID or partial ID and then click. - Depending on your system configuration, as you tab through the fields, if there's only one billing provider, the Billing Provider name updates with the ID you entered.
- Patient Notes might display together with a
Depending on your system settings, the
Action DateandIssued Date:- are typically set with a date that is years in the past so the claims aren't included in any back end processing.
- the default date is automatically entered when you tab into the date fields or press
Enter.
- As necessary complete the remaining fields. See the Claims Header workspace field descriptions above.
- In
- Click the
Linessubtab.- In the diagnosis code International Classification of Diseases. A coding system developed by the World Health Organization (WHO) for the classification of diseases, symptoms, abnormal findings, external causes of injury, and cause of death. Includes both ICD-9 and ICD-10 codes. in the
Abox, enter codes if necessary to the right of the appropriate diagnosis pointer boxes. - Complete the
Proc, Qty, Billed Amt, andBCodeinformation. - As necessary, complete the remaining fields on the
Lineworkspace. See the Claims Lines workspace field descriptions in Claim Entry.
- In the diagnosis code
-
Access the
Overridesworkspace if you need to enter Override information.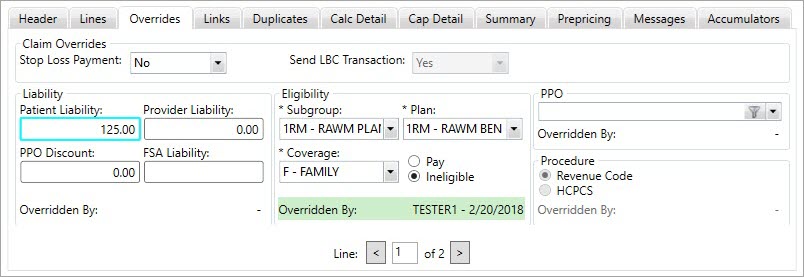 Overrides workspace field descriptions
* indicates a required field
Field Description Claim Overrides Stop Loss Payment
If a benefit payment is too large, it might qualify as a Stop Loss Payment, where the fund office only needs to cover up to a certain amount to avoid using up the fund reserves on one claim.
- Select
YesorNo. The default isNo.
Send LBC Transaction
The Labor BlueCard process enables self-administered benefit funds to access the BlueCross BlueShield (BCBS) provider network to process claims
- If you use the LBC process, but want don't want to send a transaction file to Blue Cross Blue Shield (BCBS) Illinois for a claim, select
No. - If you don't use BCBS as a Trading Partner, the option is disabled.
Liability Patient Liability
Amount the patient owes.
Note: The amount is calculated automatically, but you can override it on the Claim Entry or Processing Overrides workspace.
Provider Liability
Amount that is the provider's responsibility.
-
For example, a provider belongs to a network and bills $90 for a procedure. The network only allows $50. If the claim is paid at 100% (no patient responsibility), then the provider is liable for the remaining $40.
Note: The amount is calculated automatically, but you can override it on the Claim Entry or Processing Overrides workspace.
PPO Discount
The Preferred Provider Organization (PPO
A group of providers who contract with employers, insurers or administrators to provide services to individuals for a negotiated amount.) discount is the amount the member saves using a network provider.- The PPO discount is the difference between the provider's billed amount and the PPO's allowed amount.
- If the plan doesn't use a PPO network, it will be zero.
Note: The amount is calculated automatically, but you can override it on the Claim Entry or Processing Overrides workspace.
FSA Liability Amount that could be FSA
Accounts offered and administered by employers that provide a way for employees to set aside, out of their paycheck, pretax dollars to pay for the employee’s share of insurance premiums or medical expenses not covered by the employer’s health plan. eligible. - Patient Liability—Non-reimbursable Ineligible Amounts.
Note: The amount is calculated automatically, but you can override it on the Claim Entry or Processing Overrides workspace.
Overridden By The operator ID of the person who last entered an override code/amount and the time. Eligibility Subgroup *
Code and name of the active subgroup
A way to categorize group members into a certain set for benefit plans (e.g. active and retired employees). Subgroup distinctions are only used in Claims, COBRA and Eligibility. that is associated with a current health plan. - Only active subgroups display in the list.
- If there's no active eligibility for a patient, the Eligibility override fields default (Subgroup, Plan, Coverage) to the patient's last active eligibility.
Plan * Code and name of the benefit plan
A benefit plan identifies the benefits an individual receives as the result of his or her association with a subgroup. associated with the selected subgroup. - If there's no active eligibility for a patient the Eligibility override fields default (Subgroup, Plan, Coverage) to the patient's last active eligibility.
Coverage * The coverage code identifies who is covered by a benefit plan type, for example, individual or family.
- Choices are limited to coverage options that apply to the selected benefit plan and the patient's relationship to the member.
Pay Option that allows you to pay an ineligible claim if you have the appropriate permissions.
Ineligible Option that allows you to designate a paid claim as ineligible. Overridden By The operator ID of the person who last entered an eligibility override code/amount and the time. PPO PPO Preferred Provider Organization (PPO
A group of providers who contract with employers, insurers or administrators to provide services to individuals for a negotiated amount.). Code and PPO name. - Choices are limited to PPOs for the selected benefit Plan and claim dates.
-
If there's more than one line in the claim, once you choose the PPO, an Override PPO window displays:
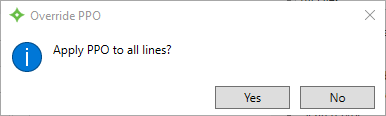
Click
Yesto apply the override to all the claim's lines, or clickNoto only apply to the selected line.
Overridden By The operator ID of the person who last entered a PPO override code/amount and the time. Procedure (applies to Institutional claims) Procedure If both Revenue and HCPCS codes are present on a claim line, the override feature becomes enabled so you can choose which codes determine the claim eligibility and pricing.
Overridden By The operator ID of the person who last entered a Procedure override code/amount and the time. - Select
- If there's no active line item patient eligibility, the Eligibility override defaults to the last active eligibility associated with the patient and the
Overridden Byis cleared. TheLinesworkspace—Ineligible Code section updates with theIEBcode and full billed amount. - Use the
F7key or clickVerify. - Click the
Linksworkspace if you need to enter Links information. See the Claims Links workspace field descriptions, Linked admissions messages, and Linked illnesses messages. - Click the
Calc Detailworkspace if you need to enter Calc Detail information. See Add, update, and delete claims calculations and Calc Detail workspace field descriptions. - Depending on your system settings, messages might display. Click the
Messagesworkspace if you need to enter message information. See Add, update, or delete claims messages. -
When you have finished entering the required claim information, click
 to validate and calculate the claim. Important! You can't save historical claims with Edits on them. You must resolve all Pends and Audits (if any) before you can save the claim.
-
See Save a claim for more information about messages and other behaviors that might happen when you save (depending on your system configuration).
- The claim saves with an
HIstatus and you can't delete it. - No checks generate from historical claims.
-